
THE EXTERIOR
 A grey house with white trim and a bright green door. Perfectly casual in every way. I think this fits right in in Anytown, USA. I love the way the white roof turned out and the chunky white trim. The house originally had no door, so I faked that one with paint and trim. I still want to add some detail to it, paint in a knob, knocker, some house numbers—23 is significant to us. I also added white trim to all of the corners. I did this for aesthetics but also for durability. The trim is a bit thicker than the siding, therefore the edges are not exposed to get snagged or pulled. It's my intention that that siding be on there for life.
THE INTERIOR
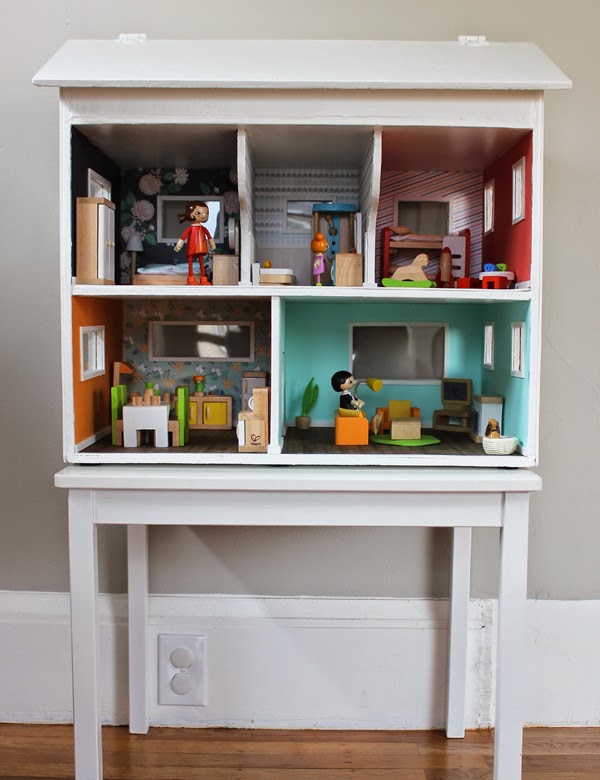 As you can see, the house is pretty small, with just five rooms. But we live in a small house too so really, there's no challenge here. I divvied up the spaces the way I always have, clockwise from top left: parents' room, bathroom, kid's room, kitchen and living room. When I was picking out all of those papers, this is the visual I was most excited about. I wanted to give each room the appropriate personality, but still have continuity across the rooms. All of the solid walls use paper of the same texture, it almost looks like grasscloth. And of course, all of the patterns were from the same line.
Before I get in to the details, let's just reveal that I went with all Hape furniture in the house. Originally I thought I might be able to salvage at least some of the furniture I had collected. But really, what survived was not in good shape. The years and climate did a real number on the wood and the glue that held it all together. There are a couple pieces ripe for restoration and it's my hoping that when Thora is older, she might like to do this with me. At this point, I just want her to play without my worry standing over her. The Hape furniture is really adorable and perfect for small hands. It's wood and nontoxic. It's not cheap though. I bought all of my pieces from Amazon during the holiday season and that proved best price for me. I would've loved to have bought them locally, we have many great and small toy stores here, but I couldn't swallow the nearly $10 price difference per room. In the end, right choice by far. It all just makes the house.
THE FAMILY
 Like are you kidding. Is this an exact replica of our own little family or what? Well, maybe if we are dressed in our hipster best. That Lady in the Tramp dog is mine from when I was little. Oh yeah, I collected miniature porcelain figurines too. I was that girl.
THE PARENTS' ROOM
 I love the dark navy and floral walls here. It's the perfect parents' retreat. The bright orange rug came with the set and it picks up the orange in the little flowers.
THE BATHROOM
 I'm still debating taking the shower out of here, it's so cramped! The hardest part here was lining up the wallpaper pattern to go around the room. It was just a bit tricky with my wonky walls. The wainscoting was created with extra flooring, I simply painted it with watered-down paint to get a white-washed look. Then a thin piece of trim topped it off.
THE KID'S ROOM
 What's to say, cute bunk beds? Check. Rocket ship? What more could you ask for. I will say this, I haven't gotten so far as adding unique, personalized touches to the house. As in, there is no art on the walls, no extra details other than the finishes. I look forward to doing those things over time. But for now, Thora's favorite part might be the little stools. She pulls them up to the bathroom sink and has her doll pretend to brush teeth.
THE KITCHEN

 Kitchens need to be cheery, and this little eat-in is certainly that. Sherbet walls with a floral backdrop, colorful cabinets, large windows and many doors to open and shut. The dining set even came with silverware! But I'm keeping that aside for a year or so—choking hazard.
THE LIVING ROOM
 I couldn't find a fourth pattern to use on the back of this wall, so I went all ocean blue, all the time. This room is the most apparent for lacking personal touches. We need art on these walls! And maybe a bigger rug. And maybe a picture of Little Mermaid on the tv, since Thora can't stop singing THAT SONG. You thought it was Frozen? No, it's Little Mermaid apparently. (A quick Google research revealed that Ariel was voiced by an actress from Rockford. Holla!) P.S. That wrinkle on the left gives me an eye twitch.
THE ATTIC
 Oh my gosh, I almost forgot the best part. The attic is a surprise little gem. I actually didn't show Thora that the attic swung open until she had her house for a week or so. Let's just say, mind. blown. Right now, I have it outfitted literally as an attic would. It's got some of Grandma's things on one side and will eventually be a playroom on the other. Details in time.
 So that's it in a dollhouse nutshell. Thora loves her little house and I love, love, love watching her play with it. She likes to put the family to bed, she likes to put them on the potty and sit around the table. It's like it was made for her or something! I love that I was able to do this for her. I hope it gives her many wonderful memories and feeds her imagination.
 Not a bad way to spend 3.
THE INTERIOR
Before I get in to the details, let's just reveal that I went with all Hape furniture in the house. Originally I thought I might be able to salvage at least some of the furniture I had collected. But really, what survived was not in good shape. The years and climate did a real number on the wood and the glue that held it all together. There are a couple pieces ripe for restoration and it's my hoping that when Thora is older, she might like to do this with me. At this point, I just want her to play without my worry standing over her. The Hape furniture is really adorable and perfect for small hands. It's wood and nontoxic. It's not cheap though. I bought all of my pieces from Amazon during the holiday season and that proved best price for me. I would've loved to have bought them locally, we have many great and small toy stores here, but I couldn't swallow the nearly $10 price difference per room. In the end, right choice by far. It all just makes the house.
THE FAMILY
THE PARENTS' ROOM
THE BATHROOM
THE KID'S ROOM
THE KITCHEN
THE LIVING ROOM
THE ATTIC


