Showing posts with label demo. Show all posts

3.18.2013

RELOCATING THE ATTIC ACCESS

Everyone aboard the time machine! 

Buried in the land of pre-baby draft posts, I found this little gem of dust and debris and necessary roughness. There was no text, only these before and during photos. No after photos either, so I'll have to run and take those. But it's all coming back to me, like the foggy nightmare that it was...

The attic access panel used to be located in the kitchen, specifically in the odd little laundry/office nook. We knew once we removed that wall, the panel would have to go somewhere else. It's not exactly ideal to have a huge hole in your brand new kitchen ceiling. And might I add, once we removed the plaster and lathe from the ceiling, because it sagged just so, we discovered the original panel was done all wrong. Certainly not to code size-wise and I highly doubt the City of Oakland is okay with cut rafters. So we had the rafters replaced and determined a new locale. The hallway made the most sense to me.


Before we drywalled the kitchen ceiling, we took quick advantage of the easy access. Mike crawled around up there and I yelled from below and together we figured the perfect spot. The furnace sits up here too (my dad can NOT figure out why our furnace is in the attic and all our returns in the ceilings. I tend to agree. It must be a California thing?) and we needed to work around it.

I did some research about code and what size the final opening needs to be. Happily we discovered our opening fit perfectly between two beams and because the ceiling is supported by two walls on either side, we would not have to compromise it in any way. Hooray!

Draw it out and git to cuttin.' I think that says "Boats & Hoes"? Step Brothers must've been on.

This part was all Mike. I was hugely pregnant so I just tried to stay out of the way of the falling dust and cussing husband. It was not easy, for anyone. But the general idea, cut a hole, frame it with 2x4s, trim it out and add a door.

That piece of wood in the front is part of the board that the furnace sits on. It cuts into the space a person needs to fit through the hole, but there is really no way around it. I figure if and when we need to replace the furnace, we can scoot it over a bit.

Like I said, messy.


But looking good! 

Now here is where I might lose you because I have no images of the framing. But trust, we wrapped it in 2x4s and Mike called it a day. 

I was happy to trim it out and make the door. See? Happy. (I debated whether I should post this horribly flattering photo, the belly hanging out under my shirt is a nice touch, then thought, heck with it. Pregnant Renovation Ladies Unite!) And yeah, Trams Am tee.

The trim is set in an 1/8" if I remember right to support the door. I added a knob because I can not stand dirty handprints. No excuses contractors of the future! I also added a strip of window insulation along the seam to keep drafts out. Seems to work just fine. It's painted the same as all of our trim, Benjamin Moore's Aura Satin in Simply White.

And there you have it. Our new attic access tucked discreetly in the hallway and in no way threatening the stability of our home. Pat on the back to us! Boats and Hoes!


1.18.2011

It best come down - Part One

Oh my word. There was a summit in our kitchen between us, a carpenter and a drywaller. We all stood, arms folded, all eyes fixed on the kitchen ceiling.

Drywaller: Yes, that is drywall on top of plaster and lathe, and hmm, it does seem to be sagging. Perhaps it is too heavy.
Me: Well, we could pop off just the drywall and replace it, back on top of the plaster but screwed in tight.
Drywaller: Well, you could, but that would not make it better, it would make it the same.
Carpenter: I agree. Tear it all down, that is best. Only way to know what's really going on up there.
Me: But the insulation! It's old blow in. I'm scared.
Drywaller: Not to worry. It is not toxic, only very messy. I will do it, no charge.
Me and Mike in unison: For reals?
(In walks Electrician who had been working downstairs.)
Electrician: I love this idea. It will make my work much easier.
Everyone together: agreed!

And so it was. We scheduled the drywaller to come back in two days to demo the kitchen ceiling. He was gonna "bring some guys" as they say. Well, the big day came and perhaps with a fresh perspective, he sort of backed out on the deal. He could not handle the insulation, not for free and not today. His guys were "too big." I kid you not, that's what he said. They would take down just the plaster, leave the lathe and we would be responsible for the rest.

I was taken aback, could not compute this curveball. so. very. confused. But yet, even removing the plaster was hard work, and he was still not charging us for it. And his price for the drywall to come was quite favorable, we did not want to lose him. I looked at Mike, my dear Mike, my champion. And he agreed, he would finish the job.

Sagging drywall, gotta go
All gone!
This is what the guys left for Mike. All that lathe and on top, 
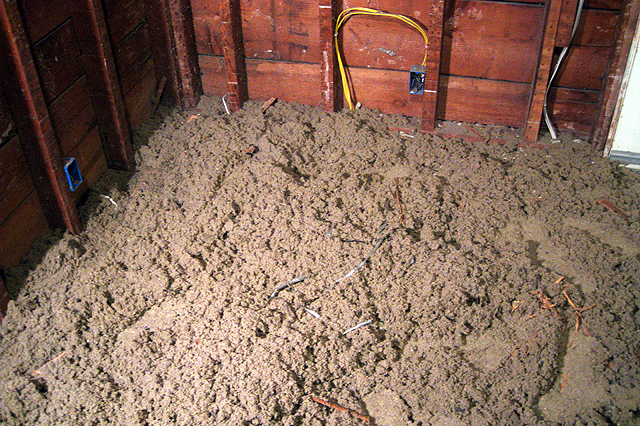
about 8 inches of cellulose insulation, so very old and dusty.
Only one way to start. Crowbar!!
Mike worked well into the night to get this done in a single day. I was regulated 
to the other end of the house, on account of being pregnant and all. I tell you, it was 
hard to sit there and not help. This was a lot of work and the guilt runneth over!
He was left with a ton of insulation to shovel into bags, looks like the Moon...
And a pile of lathe to haul to the dump.

Coming up: How we dealt with an open ceiling during the coldest weeks of the year, repairing rafters, relocating the attic access panel, keeping your inspector happy and adding new insulation...

6.10.2010

Skinny legs and all

Oh the kitchen. Probably the most important room in the house and ours is destroyed! One thing I've learned about us during this process, we like to tear stuff down. It feels good. It feels successful. The catch though, what to do next!

We are first-timers after all. I've never built a kitchen. But I do have a very distinct idea of what I want this kitchen to be: all white cabinets (since eternity I've wanted this) with dark countertops, a black center island with two turned legs and industrial stools. I want dark stained wood floors (against the better judgment of nearly every contractor I've met) and a sliding barn door to the back studio would be keen. I'd like to incorporate my old farm table. I want a backsplash made from Heath tiles and an entire wall covered in chalkboard paint. How about a sun tunnel? Better lighting is a must of course, likely some recessed, plus pendants from Schoolhouse. Stainless appliances are a no-brainer. There there's a new window... I entered a raffle at the Temescal Fair, cross your fingers!

Okay Tonya, time to climb off that cloud. Those are all fantastic dreams, fantastical really considering the current state of our wallets. Termites and all that, expensive. But while we recoup funds for this kitchen makeover, we decided to finish demo so that when the time comes, we're ready. Anything we can do ourselves, we do.

{my beloved farm table, you will have a place here!}

This being the old house it is, our walls are plaster and lathe. Which is charming in its own lumpy way, but some of it had to go. In certain areas it was literally falling from the wall in massive chunks, namely behind the old washer/dryer. So down it went.

The house lacks insulation on all exterior walls. When we repaired the fireplace wall in the living room, we added insulation. Not only does it warm up the place but it also helps cut noise from the street. Value! Anyway, I figured since this kitchen is a gut, might as well take the exterior wall down to studs too. You learn so much about your house doing this. We found both windows were wider and taller. The door to the back studio (which used to lead outside before the addition) was also wider, or maybe it had a window panel down its side.


 {exterior wall, to the right of the fridge is our pantry}

The kitchen had a double-bowl stainless sink that worked fine. We thought we'd be able to demo around it and prop it up with a couple 2x4s. Ha! The ignorance... of course it came crashing to the ground. So we took this opportunity to buy our first cabinet and dream sink. I've been pricing about town and like so many of us, landed on Ikea. We're going with Lidingo for the most part (intend to customize somehow, mix it up a bit) and the Domsjo sink can't be beat. To help support the sink and give us more liveable space (I expect we're going to be in this state quite a while) I built a couple makeshift countertops. It's simple 2x4s, MDF and particle board. Both counters cost about $50 with paint. Mike wasn't a believer and I'm still trying to prove this was worth it. I figure when it's all said and done, my fake counters will make the perfect worktable in the garage.

{DIY build on the fly. Its function: support the sink and provide valuable workspace}

 {view up the steps from the "back studio", that's fancy talk for addition, and "addition" is fancy talk for porch with walls.}

There are two vents for a stove. The one hanging out of the ceiling is current, but the behemoth behind is from the olden days. Still not sure if we plan to remove it, it really isn't in the way. Right next to it is a little built-in cabinet we plan to keep, either as a broom closet or giant spice rack. The drywall on the right is the back of a closet in the dining room. The left wall is repairable, just uneven from poorly done patches. Can you picture the entire span of that wall as a chalkboard? I can...

{opposite view walking in from the dining room}

Ugh, those floors and that ceiling! The ceiling is a nightmare. I need to call in reinforcements. There is drywall on top of plaster in SOME spots, plus that header from the wall we took out, plus that entrance to the attic is getting moved to the hallway. It's going to take a lot of work to level it out, a project for the pros. I want to swap out that door for a sliding barn door, in a vibrant color maybe? Still no verdict on that window. I need the light big time so I don't want to wall it in necessarily.

I wanted to leave you with something pretty. The window above the sink gets crazy light, so it's lined up with plants that currently have no where else to go. Adorable, yes?

So there you have it. Our little kitchen, skinny legs and all. We still don't have a stove, we still use the old basement refrigerator. But we're actually enjoying the log cabin feel of our exposed skeleton. Don't worry kitchen, we have big plans for you...

3.01.2010

Progress! ...and a fireplace update

It's all happening, the buzz of saws and the slams of a hammer, music to my ears. This is a big week. We finally settled on a contractor for the dry rot. At this very moment, my new best friend Bob is down in the basement toiling away. Some things you just can't do yourself and anything structural qualifies. Bob's list of to dos:

1. replace dry rot in new laundry room, under old laundry room, above the fireplace and under the porch
2. repair main beam under old laundry room and replace single support post and wall with two new supports so room can remain open
3. repair subfloor in kitchen (he actually has a stockpile of the same wood planks so we don't have to use plywood)
4. remove all unused water and gas lines in old laundry room and cap off
5. remove old furnace under entry/dining room

All of this will take two weeks and immediately following, the plumber will install our tankless water heater, my refurbished vintage sink and, drumroll please, the washer and dryer.

What's this? Is the sun shining? Are birds singing?

Not only that but last week we met some great roofers who fixed our leaking chimney. Can you believe the flashing was NEVER done properly, not ever? It was a slow trickle over many, many years that caused that damage. If you can stomach the horror and are in need of a recap, go here.

Speaking of, I did a little more demo on the wall because I was noticing as contractors came through for bids, they were assuming the worst. As such, they're bids were high and the proposed work seriously invasive. I figured it best to remove all the wall and the bookcases down to the studs so we can really see what's going on. It was messy but totally worth it.


It was exciting to remove that 70s paneling and unearth the original beadboard. At first glance, I thought it was intact. Alas, that wasn't so. It was pretty crumbly and even cut up on the right side. I still plan to salvage these boards and try to make something small, a curio maybe, but their life surrounding a mantel is over.


Never in my life have I seen the guts of a fireplace and I had no idea how they are put together. Tomorrow a chimney expert is coming over to give it a once-over and educate us on the possibilities, if there are any. Right now we are thinking this burned coal, that it is heavily damaged and unless we spend thousands, it will never be more than decorative. But we'll see what the experts say.


Voila! See that angled 2x4 and how it's completely missing at the chimney? It directed water to flow to the left, leaving the entire right side intact. Really, not so bad!


Once we got this far, the windows literally begged to be stripped. I still can't fathom the intention here. Anyway, it was Valentine's Day and the sun was out so we went for it.


Two coats of Citristrip and some good scraping and it's a whole new world. Isn't that right, Orange?

2.20.2010

What I mean when I say "demo" {PART 2}

The kitchen is the heart of the home, or something like that. Ours is the bane of my existence. It was the very first room we started ripping into and it may well be the last thing we finish. A kitchen is a BIG DEAL and I was unaware of its complexity, its many layers (of linoleum. of which there were 4). There is much to consider: walls, floors, electrical, water, gas, counters, cabinets, upper, lower, how tall? how many? is Ikea tragic or perfectly suitable? maybe Home Depot or something custom we likely can't afford? Then of course appliances, fixtures, lighting. Oh, it would be so nice to put wood floors in here. I'd stain them nearly black but that means I would have to refinish ALL the floors to match and that would be lovely, but oh... maybe tile is fine?

This is my brain. at night. when I can't sleep.

All of that insanity, that's the fun part, and yet again, we aren't there yet. Where we are is a state of progress. We can see what we have and we've eliminated all the waste. The kitchen will have its day once we repair all the rot and leaks everywhere else. So it lies in waiting. Here's where we've been:


The kitchen before, well, it was old. Normally I love old and go out of my way to cherish it. But this kitchen was old, haggard, dirty, dingy and expired. The cabinets were solid wood, I'm guessing from the 50s and they'd been painted many times over. Did I mention dirty? This applies here. They weren't functional, the corners impossible to reach. I think our seller would agree because she left food in the way back. Other surprises were spiders and ants. Yum! Note the lowered sink. This coordinates with our wheelchair lift and tall toilet in the bathroom. That tube hanging off it is from the old refrigerator. We bought this house with no appliances which honestly, was a blessing.


See that wall there. I hated it from day one. It sections off what was a laundry room and office. That space was dark and begging to be part of the kitchen. And since the laundry was going downstairs I set my sights on tearing it down.


Here's the original laundry area. At first glance it isn't so bad. Those cabinets are kind of cute, physically slimy but charming in a way. Sadly, they were built in so tightly to the wall, they became casualties of demo. And the floor, well, its rotten. The washing machine must have been quietly leaking for years.


It all started with the floor and a curious little jab in the lino. We just wanted to see if it was going to be hard or easy to remove. One thing led to another and the next thing we knew, demo was underway.


Destroy!!! We got down to the soft wood in some spots but that last layer of lino was proving tough. One contractor said it probably contains asbestos so our best bet is to stop chipping at it. We will lay our new floor, whatever that may be, right on top.

Next Mike surprised me by removing the vent hood. This was the greasiest thing I had ever seen and I couldn't walk by it without gagging. I'd much rather look at this messed up wall. We uncovered the original stove pipe peaking out. This thing is intense and all mortor of some kind, super solid. Luckily it's been sealed in the attic so other than being gigantic, it proves no harm. We'll likely leave it there as homage to 1922.


And now for the nitty gritty, cabinets and soffits. See ya!


I want to note, we did get permission from a contractor to tear out that wall. It wasn't supporting a thing. During demo we discovered that part of this wall was actually original. I thought surely the whole thing had been added when they created the laundry. Using my Sherlock skills I determined that only the pocket door was added and at one point this was a simple wide entrance. To where? A mudroom?


And here we sit. This is our mostly-demoed-exposed-asbestos-floor-but-look-at-how-open kitchen!


Right about now, you may wonder how we survive. Well, we did bring up the basement fridge, gave it a makeover. Then of course there's the microwave. But best of all, the trusty George Foreman.

2.08.2010

What I mean when I say "demo" {PART 1}

It has occurred to me that perhaps I haven't been clear concerning the amount of demo which consumes our lives. Maybe you were wondering, why hasn't this girl picked up a paint brush, done a little decorating, finished off a room? I mean, it's been 3 months already! The sad fact is, now is not the time. Dust rules the land, so does dry rot. There is no point in painting or putting anything out, for within moments it is covered in a white film of debris. All of my pretties are in boxes, stacked in a back room, feeling neglected. At least Mike managed to pull out his record player and 7 inches yesterday, just to feel normal.

What's the matter? You still don't get it? Allow me...

I'm going to start with the basement. Here it is when we moved in, all finished off and divided into three rooms, two closets, a hallway, a bathroom, a garage and a scary room under the porch!


Above is the first room when you come down the stairs, this was sort of a living room.


Through the doorway on the right was a bedroom...


home to a contraption right out of Clue: art disguising access to the dryer vent!


Straight back was the kitchen I've mentioned lots before. We're actually using that fridge right now, temporarily. It's upstairs in the real kitchen (which will be PART 2).


Opposite the sink is a second access to the hallway which leads to the bathroom. We aren't going there for a veerrry long time.


But speaking of the hallway, it holds three cubbies of hidden treasure, mostly in the form of animal feces.

What may or not be evident in all of this is the mess of wires and plumbing criss-crossing every possible surface. We know our seller loved her some tv and telephone because it is in EVERY ROOM of the house. It's all very haphazard. I call it "reactionary design."

During our inspections we found out that some of the foundation behind the walls was shedding its parge coat. What the heck's a parge coat? Well, it's smooth concrete on top of rough concrete whose purpose is mostly aesthetic. We were told this was normal and not alarming. There was also some evidence of dry rot and termite damage. As you can imagine, with everything closed up like this, it was hard to read. After treating for termites, next up was demo, which leads me to the point of all this:


After ripping up flooring (laminate and carpet, egads), Mike tackled the walls.


This wall we hope to remove completely but that's a support beam in the middle (which once was round and had since been shaved to fit inside the drywall!) and the header is the main support for the upstairs. We'll get creative here, I see pillars for an open look. Eventually this space will be an amazing art studio.


Here's an example of the parge coat built up behind the wall. I can just imagine the sound of falling sand as it happened over forty plus years. This was pretty much everywhere, on every wall.


We found artifacts. I've never heard of Burgermeister beer but that name is righteous. I also found a newspaper from 1967. Good clue! What we didn't find, insulation. There is also no heating down here. I'm still shocked someone lived in this space.


Now that we (well, Mike) got all the drywall, time for the framing.


A lot of this was rotten. I have since vowed never to drywall a basement, especially one almost 100 years old. Talk about asking for trouble.


Ahh, this really opens up the space and it feels much less mysterious down here. I was in charge of sweeping up all that dust and I scraped the walls as best I could with a wire brush to remove most of the loose particles. Our goal is to put on a new parge coat and seal it up pretty.


Believe it or not, that was all easy compared to the ceilings. They were covered in plywood attached with MANY NAILS. In fact, we are still tackling this with the hallway yet to do.

At this point, I've vacuumed up the dust, dead bugs and cobwebs. We took 4 trips to the dump (more on that later). Now, after this weekend's great reveal in the laundry room, we need to remove the plywood all along the top of the foundation to see what, if any, 2x4s are rotten. The mudsill is questionable in parts and we revealed rot in some support beams. Time to call in the pros...