Showing posts with label kitchen. Show all posts

3.06.2013

BUILDING A KITCHEN BENCH » PART 1

There is a corner of our kitchen that I envisioned the ideal locale for a wrap-around built-in storage bench. The idea seemed logical and simple and kind of a no-brainer. It's also another way to bring the Ikea cabinets up a notch, a prerequisite for all kitchen decisions.


Of course I hit up the internet for ideas and was overwhelmed by all the beautiful ways the kitchen bench has been done. I love, LOVE it when a homeowner is able to work with a true craftsman—custom molding, maybe a curved edge... yum. And out of my league. This project was going to be me on an island.

I sat on it for two years because of work and life and smaller reno projects, and every day I'd pass by that corner and sigh. Thora was actually the driver in inspiring me to get this going. Poor kid was the only one eating here! We had a little table, a little stool and her highchair. She ate perched there with Mommy or Daddy staring at her from the lowly stool. Of course she is such a picky eater! No pressure, you enjoy that pasta while I stare at you and cheer your every bite. Crazybusiness.

And so after eating and drinking and dreaming my bench design for a couple days, I opted not to build a corner bench but instead do a simple straight one, cabinet to wall. I hope someday to widen the opening from the kitchen to the addition and don't want to have to rip out my hard work. Plus I have two vintage Windsor chairs that look perfect against the modern tulip table that will go here. They'll bring the warmth of wood to our stark kitchen and this way I could use them both.

With the motivation to eat family dinners all together, I put pencil to paper. Then I put paper to InDesign and whipped up a cutlist:


The final size of the bench would be 57" wide x 18" tall x 18" deep (standard height and depth for a seat), with a 48" hinged lid centered on top. The bottom sheet shows all the pieces I need to construct the bench, color-coded for different parts. (Blue is the lid, light blue are perimeter supports, yellow are wall supports, hot pink is the bottom and light pink are the front and sides.) The top shows how they all fit inside of a single 4'x8' sheet of 3/4" MDF. If I were more skilled, I would have opted for 3/4" birch plywood. But I am terribly intimated by real wood, like I don't want to embarrass it or something. MDF is in my comfort-zone. I mainly followed this video on DIY Network, with a side order of winging it.

Materials needed:
1 4'x8' 3/4" sheet of MDF
1 48" continuous hinge
3" wood screws
1 1/2" wood screws
1 1/2" finish nails
wood glue (Titebond)
wood filler and caulk

Tools:
level
drill
nail gun/compressor (mine sucked! Get a nice one)
table saw

After picking up my materials, a trip to the Tool Lending Library was in store where I borrowed the table saw. Then I set up shop in the backyard.

All cutting was done during Thora's nap. Her room is towards the front of the house which means I can get pretty loud back here. I will add, the table saw was a beast so Mike and I worked together until I got that huge 4x8 sheet down to a manageable size.

As I ripped and cut, I took care to label each piece for quick assembly later. Apologies, I forgot to take pics of construction—casualty of being in a rush. But it was incredibly simple.

I started by attaching the two sides and front to the bottom panel, with glue and 1 1/2" wood screws, making sure to predrill holes so as not to split the board. Across the back, I ran a 4" wide strip which will ultimately attach to the wall.

I lugged my basic box into the kitchen for a dry fit, it looked so good! In my excitement, I placed the perimeter support boards just to see if it truly was coming together, so those aren't attached yet. Using shims and a level, I made sure it was nice and straight, both vertically and horizontally. I lucked out that this is the most level part of our kitchen floor. Very little shimming was needed and it will all be covered by molding in the end.


Once everything was level, I attached the box to studs in the wall using 3" wood screws. No worries about cutting around this outlet and it's still accessible if for some odd reason I need it.

Then the perimeter support strips were attached using a glue/nail gun combo. The front and sides are 2" but I made the support that runs along the wall and sits under the hinge deeper than recommended, 3 1/2". This way it fills just past the hinge, which is 3" and sits on top. In my mind, that's extra support for the weakest point of the lid. Probably not necessary but it helps me sleep at night.

And lastly the top. I attached the pieces that surround the lid, making sure everything fit just so, lined up nicely and would allow the lid to go up and down. Imagine that. Then I primed and painted the lid and back piece so that I wouldn't have to work around the hinge later. I attached the hinge to the back piece first. Then slid the lid underneath, set it in place and finished the hinge. Easy!

Of course, nothing can help our wonky walls, except a little wood filler and caulk.

I added two strips on either side to fill the gap between the wall and the bench. Baseboard molding will eventually sandwich between. After filling and sanding and caulking I was left with this. Not bad! Kind of really proud of myself at this point.

And here it is with a nice coat of primer. I'll go ahead and paint it but it will probably sit like this awhile, awaiting another break in my day job and a couple more bucks in my pocket for molding. At least at this point I'm happy to say all three of us can eat together! It's made a huge difference in our general state of well-being to have family meals.

I still need to trim out the bottom of course, the baseboard will wrap around from the wall then connect to the toekick under the cabinets with 1/4 round. I'm dying to finish this up. I have plans to add a cushion, already have my fabric picked out which means I'll need to repaint the walls. I'm over citrus and am all about beeswax...


Here I am pretending everything is complete and cozy and I have a girlfriend over for a nice chat and some coffee.


Although this is our reality for now, Thora is starting to grow out of her highchair. That highchair breaks down to a booster that attaches to a chair, then I can pull her up to the table. All in all, serious progress!

Now what to do about that awful window to nowhere.

2.26.2013

STRANGE DILEMMA

This is not a problem I ever thought I'd have. See this garbage can here, the one on top of a stool? I've had that can since forever, even remember buying it off that big wall at Bed Bath and Beyond. Please understand, we are not kitchen-garbage-under-the-sink type people. We are get-the-biggest-can-they-sell-take-trash-out-once-a-week type people.


That's until we had a toddler in the house. One who likes to put her toys in there. Sigh... alphabet magnets, crayons, even her beloved matching squares from Petit Collage! We've had two matching zebra casualties. None more sad than myself.

It's time for a new solution, one of the smaller-can-inside-a-cabinet variety. Oh children, they bring such sacrifice! To the left of the fridge I have a 24" pantry, where we currently hide recycling, and I imagine it will go there. I still need to find the perfect can and I hate everything I see. So until a solution manifests itself, this workhorse shall remain perched on the stool, out of reach of grabby hands.

BTW, this photo causes me anxiety for the following reasons:

1. there is still no trim around the doors or floors in our kitchen
2. all doors in the hallway have yet to be painted
3. all doors in the hallway desperately need new knobs
4. poor placement of the knobs on our pantry has given our over-priced refrigerator dimples
5. oh yeah, forgot to add quarter round to the toekick

2.25.2011

VCT IN THE KITCHEN? WORKS FOR ME!

After the drama surrounding the drywall, I needed a simple project. Most people would not say installing flooring is simple, but in all honesty, this was! You may remember that I had found a great deal on wood floors for the kitchen. The contractor came highly recommended, his price was right and I really wanted them. But last minute expenses ate into the budget and even though they were a good deal, we could no longer afford them. I came to this realization on a Tuesday. By Wednesday I had designed and purchased alternate flooring, and resolved to do it myself.
The only aspect of this project I wasn't comfortable doing was leveling and putting down a subfloor. The folks at the flooring store gave me good direction, Mike and I went shopping for supplies and we called Steve for the labor. We used 1/4" luan board for the subfloor. Steve installed this using gold screws every four inches at the seams, then every 6 inches across the field. After he was done, Mike spackled all the screws and seams, then gave it a light sanding.

I chose to go with VCT flooring. Is this controversial? Maybe a little too taste-specific, as my realtor might say? Perhaps. It either conjures positive memories of your grade school (as it does for me) or a fear of long hospital corridors. But I think it's all in the application. It seems to be in the middle of a resurgence for residential use, no longer relegated to 70's basements, hand-in-hand with dark wood paneling, it's okay to bring it front and center. And it comes in so many colors!

Side note: I generally hate most tile. It's too typical, especially what we could afford and with our timeframe. I went to the big box stores and tried to get myself to like something, anything in the porcelain or stone variety. It all said "blah" and "eh" to me. As I walked the aisle, I believe I mumbled these phrases out loud.

We went with Mannington Essentials in three colors; Silver White, Pewter and Night Black. I did a little internet research to define my pattern and was inspired by a basketweave I had found. Once I decided on my pattern, I hit up my digital kitchen floorplan that I had created in InDesign and started laying it out. I wanted to make sure I had the least amount of cutting to do–that the perimeter would be nice and visually even. I think this was a key step in making the process simple. That little printout of my design was critical during layout!
First step was to determine my 45 angle. I used a carpenter's square in the corner, then snapped a chalk line the length of the room. I used that line to roughly lay out the tiles to make sure they matched my computer drawing, which mine did, I couldn't believe it! I then chose a single tile as my starter and with a Sharpie I carefully outlined it. You start laying tile in the middle of the room because if you can help it, you don't want to touch the glue! I stepped on it once and lost a sock.
Next is to trowel on the glue, pay attention to manufacturer's specs. You want to do half of the room at a time, starting in the corner and working toward the middle. Oh crap, I let the extension chord sit on the glue! That was fun to remove I tell you.
Believe it or not, this glue is nontoxic with no-vocs. I was told it was safe to use while pregnant, but it is some stinky, not to mention sticky, stuff!
Wait impatiently for glue to dry from yellow to clear, which indicates it's ready for tile.
Starting with the outlined tile, carefully start placing tiles, butting them TIGHT. I referenced my printout often to make sure I didn't screw up the pattern. If you make a mistake and need to take up a tile, it's really difficult and the tile will break. Growl. This part goes fast and once complete, repeat the process on the other half of the room, then retreat to the couch with a piece of cake. I waited to do the perimeter and any cut tiles the next day, the glue gives you 24 hours to set tile.
I forgot to take a picture of my template! It was a cardboard contraption that I used to measure my cuts, and made the process fairly uncomplicated. It's okay if the tiles aren't tight to the wall since this will eventually be covered with baseboard. The tiles cut easily by scoring with a utility blade, then carefully snapping. Not gonna lie, this was simple but tedious. My fingertips were pretty raw by the end.

Once it's done, stand back and stare at it. Leave the room then comeback, just to make sure it's still there. Go ahead, let your cats crawl on it, they will be mesmerized. All that's left is to wait 24 hours for glue to set, give it a good clean using this, then coat it 3 times with this. Let it dry and you are DONE!

2.22.2011

DRYWALL, EASIER SAID THAN DONE

Drywall, sheetrock, tom-A-to, tom-AH-to. I'm from the Midwest so I'm going with drywall, and it was a nightmare. On TV, it always looks so simple, casually mentioned post commercial break. And our drywaller, he promised to do the entire kitchen and basement in 4 days. I gave him a skeptical look but he nodded his head and yes, yes, 4 days. Fast forward three weeks later, and the walls were finally complete.

I'd like to spare you the details but they are truly breathtaking. Let's sum it up like this: show up late, don't show up at all, don't call, sneak out the back door at the end of each day, no progress checks, on days you show up you are greeted by overstressed pregnant lady who walks through all your mistakes, you give her excuses, lots of them, you tell her she's nesting, she hands reigns to husband, your definition of a skim coat equals my version of frosting a cake, there is lots of dust and you are messy, I'm the one who put plastic on my doorways, your truck breaks down, we don't see you, you send a text message with photo of your tire, no note, this is odd yet becomes the norm, and seems to go on forever.

BUT, in the end, those are some nice looking walls and ceiling. We are happy and you apologize. I hand you a check and we call it a day. I don't hate my drywaller. I think he promises more than he can deliver and I imagine most of his projects go this way. I would not want his life.

And now... our kitchen. With walls! And what's that? A ceiling!

 {Future location of stove and microwave, original swinging door to dining room.}
 {Still rocking the awesome security system. Yes, that is a dowel rod. Handmade curtains 
and a beautiful pendant light will soon serve as genius distraction.}
 {Looking towards the addition, knock-off tulip table to go under that window.}
 {Future pantries (two!) surrounding a fridge, with ice and water in the door. The luxury!}

Note the floors by the way. Trusty Steve laid a subfloor for us that I will go into great detail about next. And the basement is it's own entity also to be revealed later. I'd like to point out Mike had to do the final sand in this kitchen. We could not wait for said drywaller, with a deadline for painting and other things. Time to MOVE ON I say.

2.19.2011

It best come down - Part Two

Once we got the ceiling down, it was time to evaluate. If these walls could talk, they would have many tales of hack jobs, making do and downright get 'er done. I felt sad for my rafters and walls. They are old and there was evidence of abuse. They needed therapy.

We call in Steve, good old carpenter Steve, who's bailed us out now, I don't know how many times. He sweeps in with his trusty tools and gruff voice, our personal Mike Holmes. There were rafters cut right down the middle—either pieced back together with masses of nails or left to dangle, fingers crossed by past homeowners that it all stays put. (Oh, THAT's why our ceiling sagged!)

In one day Steve replaced 6 rafters and attached boards from the roofline to the rafters for added support. He agonized to get everything level for the drywall to come. It's a beautiful thing when you see someone carefully work on your home. We were left with a secure ceiling, designed to last another 100 years.
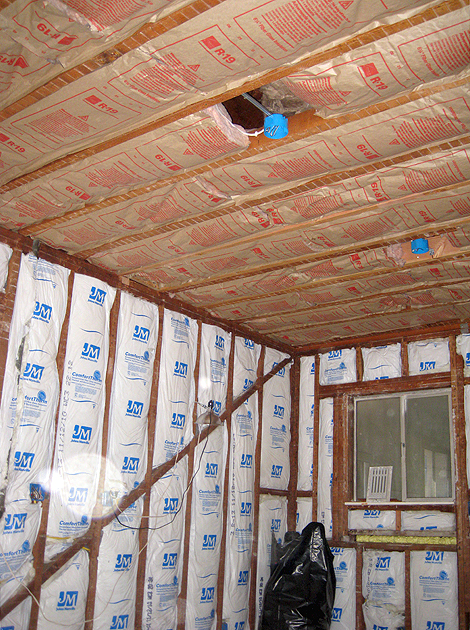
Of course, we were also left with an open ceiling in the dead of December. I think this was Christmas week too. See that vent up there on the left? That goes right outside, a big gaping hole of freezing doom. We also couldn't turn on the heat because the cold air return is in the kitchen and we didn't want to suck too much dust everywhere. I bought some space heaters and we huddled in the living room. Me, dear Mike and both kitties, igloo-style.

But that won't do. Not for long. Right away we ran out for insulation and Mike was the man for the job. We got a lot. It was a Sanford and Son moment driving this entire stock home on the back of the Chevy S10. Hilarity ensued!
Of course, this is also for the basement, but that's a story for another day. A little internet research later and he got started. I sat in the other room with the cats, listening patiently to the sound of the staple gun, blap, blap, blap, for hours. After day one, we ended up with this:
 And day two saw the beginning of a room taking shape:
Nice job! We did a happy dance, ate some takeout and called the drywaller. You're up sucker.

1.18.2011

It best come down - Part One

Oh my word. There was a summit in our kitchen between us, a carpenter and a drywaller. We all stood, arms folded, all eyes fixed on the kitchen ceiling.

Drywaller: Yes, that is drywall on top of plaster and lathe, and hmm, it does seem to be sagging. Perhaps it is too heavy.
Me: Well, we could pop off just the drywall and replace it, back on top of the plaster but screwed in tight.
Drywaller: Well, you could, but that would not make it better, it would make it the same.
Carpenter: I agree. Tear it all down, that is best. Only way to know what's really going on up there.
Me: But the insulation! It's old blow in. I'm scared.
Drywaller: Not to worry. It is not toxic, only very messy. I will do it, no charge.
Me and Mike in unison: For reals?
(In walks Electrician who had been working downstairs.)
Electrician: I love this idea. It will make my work much easier.
Everyone together: agreed!

And so it was. We scheduled the drywaller to come back in two days to demo the kitchen ceiling. He was gonna "bring some guys" as they say. Well, the big day came and perhaps with a fresh perspective, he sort of backed out on the deal. He could not handle the insulation, not for free and not today. His guys were "too big." I kid you not, that's what he said. They would take down just the plaster, leave the lathe and we would be responsible for the rest.

I was taken aback, could not compute this curveball. so. very. confused. But yet, even removing the plaster was hard work, and he was still not charging us for it. And his price for the drywall to come was quite favorable, we did not want to lose him. I looked at Mike, my dear Mike, my champion. And he agreed, he would finish the job.

Sagging drywall, gotta go
All gone!
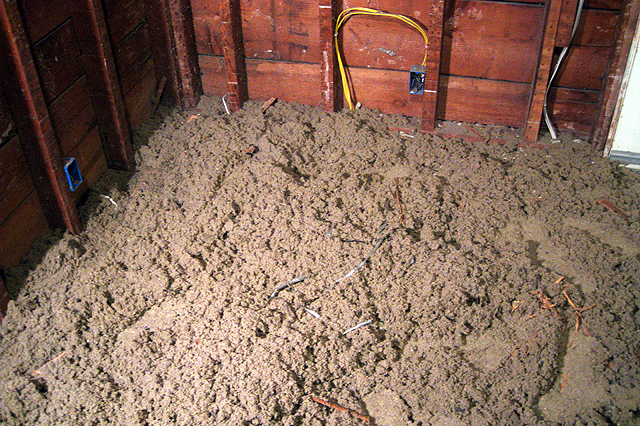
This is what the guys left for Mike. All that lathe and on top, 
about 8 inches of cellulose insulation, so very old and dusty.
Only one way to start. Crowbar!!
Mike worked well into the night to get this done in a single day. I was regulated 
to the other end of the house, on account of being pregnant and all. I tell you, it was 
hard to sit there and not help. This was a lot of work and the guilt runneth over!
He was left with a ton of insulation to shovel into bags, looks like the Moon...
And a pile of lathe to haul to the dump.

Coming up: How we dealt with an open ceiling during the coldest weeks of the year, repairing rafters, relocating the attic access panel, keeping your inspector happy and adding new insulation...

12.27.2010

The kitchen en route

Oh my gosh, we are SO close! The electrician is here as I type, furiously demolishing the octopus of wires that carries from the basement through the kitchen and every other nook and cranny of our home. Did I tell you we are a getting an upgrade to the main panel? Apparently a necessity for a modern kitchen in a 1922 house. At first I was bummed, you know, on account of it costs a lot of money, but now I'm kind of psyched. It's a clean slate for our little bungalow, a pure cleansing.

Once the electrician is done roughing in, we wait for inspections (which I anticipate being a breeze, yes I do). Know what comes next? Insulation followed by sheetrock, then FLOORS, then cabinets, then final electric and then, only a year in the making... our finished kitchen. Oh. what. bliss.

As such, I figure now is a great time to fill you in on what exactly are the plans for this most important space. It's all mapped out, purchased and piled high in the dining room. We are going with an Ikea kitchen, as so many in our demographic seem to do. Why is that? Well for me, not only is price appealing, but I appreciate being able to design my kitchen online, in my own time, with no pressure and no one breathing down my neck. I've read so many good reviews of the cabinets themselves, seen them used on Sarah's House and the like, and that gave me confidence in the quality. I love the hardware, storage options and most important, the look. It's a win win.

The goal is to achieve an affordable, stylish, out-of-the-box kitchen then disguise its mass production with use of memorable details. I spent a lot of time prowling design blogs and local real estate listings, looking for inspiration and for what's hot in my area. I'm also relying heavily on my design gut. My mood board:


1. Lighting
A single pendant for over the sink and two flush mounts for the ceiling, all hard-wired fluorescent. Purchased from Schoolhouse Electric and delivered Christmas Eve.

2. Backsplash
This is my dream, part of the new Dwell patterns from Heath Ceramics. We will be saving up for this. I love that Heath is a local resource and want very much to support that.

3. Countertop
We went with a Caesarstone countertop purchased through Ikea as part of their annual sale. The color we chose is called Raven. My dream was soapstone, funny how having a baby changes your priorities. But I think this look is similar. 

4. Wall color
I'm hoping to find the perfect shade of celery, with a hint of yellow. I had this in a kitchen in San Diego and loved it. It felt so fresh and went well with some of my retro accessories.

5. Cabinets
A white kitchen has been on my wish list for years, so Lidingo was a no-brainer. We will have a small bank of glass uppers above the dishwasher and the rest is solid.

6. Hardware
I'm not 100% on these, but it's a good option for now, it's the Lansa.

7. Flooring
Most excited about this! I've wanted wood floors all along and feared they were out of budget's reach. We did a little shopping around and were THIS close to buying up some clearance wood at Lumber Liquidators. Luckily, I mentioned this to one of my clients who talked me out of it. He had a floor guy and suggested I call him first. His name is Mario and he came over and offered up solid white oak at 2 1/4" wide, to be stained and sealed onsite with no-VOC poly, perfect for this pregnant lady. Not only will this blend well with the exisiting wood floors throughout, but it's quality. And surprisingly not that much more. Lesson learned, don't jump the gun!

8. Faucet
We have already purchased the Ringskar faucet and so far so good.

9. Sink
I hoped to find a non-Ikea farmhouse sink but the price of the Domsjo can not be beat. This sink is huge, we've actually been using it for months and I found I love it.

And now the floorplan. After we took down a wall, the final kitchen space is 12x18, minus a bump-in from a closet in the dining room, which the below does not show. Also I screwed up the size of that window above the sink, it is not squat like that:

This is the view from the back of the kitchen. The door and window in the front open up to the back addition and the two doors on the far wall go to the hallway and the dining room. I love the full pantries we are getting in either side of the fridge, both with pull-out drawers. That's a lot of storage, especially with a baby on the way! I plan to put my tulip knock-off in the corner under that window, kitty bowls to the left of the fridge.
I'm quite excited about that bank of glass-front uppers. It's an excuse for new dishes and the perfect outlet for my anal-retentive tendencies. The floor boards will actually go the other direction. The Ikea Planner is good, but not THAT good! See that strip of birch color in the corner? Drives me nuts.

We've been slowly scoring appliances from Sears for a while now. I like Black Friday and we got our Kenmore stove that way, it's stainless of course. The coordinating microwave, which will slide above the stove is from the outlet. I hope to get a fridge from there too, but am holding off until we have a place to put it! I received a used Bosch dishwasher from a carpenter friend who pulled it out of a house in Palo Alto. Apparently, the owners wanted one with hidden buttons so they replaced this practically new gem. Sweet!

And there you have it, our kitchen in a nutshell. I'm hoping this is done by the end of January. If I type it, will it come true? What I'm learning, or trying to learn during this reno process is that this stuff takes time, planning and patience. I'm proud of us for saving our pennies until we can afford a project, instead of jumping into a huge pile of debt. Yes, that means it takes longer, but when it's over, you own it. That's equity baby.

So while I while away the days our electric, drywall and flooring guys need to complete their tasks, these boxes are a welcome sight I don't mind tripping over or eating take-out on... the official countdown begins.


6.18.2010

Give Table

The past few weeks have been a killer. Lots of work (not complaining) has left little time for anything else. All work and no play, that's me! Not always, just lately. And when I work sun up to sun down for days in a row, I get annoyed. I act put-upon and sometimes I forget to wash my hair (I work from home so this is totally ALLOWED). Anyway, this past Tuesday was a big day with a big deadline. I stressed and worried and worked and in the end, I conquered.

Post victory, I settled in for a little craigslist browse, something mindless to begin my decompression. I always start in the Free section because you never know...

Title: Give Table
Reaction: Interesting wording. Ah, pic included. click!

The ad was quick to the point, some dimensions followed by two blurry photos of two tables. One, an 80's bore. The other, excuse me, some sort of Saarinen-style tulip table? Say what?

I gasp, nearly jump from my seat. Do I need this? I must, it's FREE. Hmm, size is nice. 30" diameter x 28" tall. I bust out the tape measure and check my kitchen table. Looky there, 28" tall. I wrote the author to ask if it was still around. She said yes, please come get it right away!

Now, I just mentioned how much I love my farm table. And I do, I really do! But in working out kitchen layouts I'm having a hard time fitting it in. It's another rectangle in a sea of rectangles, and I was just at the beginning of considering something round for the space. I do have other ideas for my farm table, so... my feelings of guilt are minimal.

We hopped in the Jeep and headed out to Lafayette. During the drive, some time was spent pondering whether the table could actually be authentic. I was totally kidding myself, but man, what a score that would be! We knocked on the door and the cutest French girl let us in. There was our new table, in all its free glory. It's got stains, a chip, some rust. But that silhouette is to die. Don't you agree?


We got it home and I couldn't be happier. It's just the sweetest little thing and is going to be perfect in a kitchen nook. Apartment Therapy has a post where someone had an identical base repainted at an Oakland shop. This is a great option for down the road. For now, I'll just clean it up a bit.


A couple of tiny succulents on top and I've completely forgotten about my deadlines...

6.10.2010

Skinny legs and all

Oh the kitchen. Probably the most important room in the house and ours is destroyed! One thing I've learned about us during this process, we like to tear stuff down. It feels good. It feels successful. The catch though, what to do next!

We are first-timers after all. I've never built a kitchen. But I do have a very distinct idea of what I want this kitchen to be: all white cabinets (since eternity I've wanted this) with dark countertops, a black center island with two turned legs and industrial stools. I want dark stained wood floors (against the better judgment of nearly every contractor I've met) and a sliding barn door to the back studio would be keen. I'd like to incorporate my old farm table. I want a backsplash made from Heath tiles and an entire wall covered in chalkboard paint. How about a sun tunnel? Better lighting is a must of course, likely some recessed, plus pendants from Schoolhouse. Stainless appliances are a no-brainer. There there's a new window... I entered a raffle at the Temescal Fair, cross your fingers!

Okay Tonya, time to climb off that cloud. Those are all fantastic dreams, fantastical really considering the current state of our wallets. Termites and all that, expensive. But while we recoup funds for this kitchen makeover, we decided to finish demo so that when the time comes, we're ready. Anything we can do ourselves, we do.

{my beloved farm table, you will have a place here!}

This being the old house it is, our walls are plaster and lathe. Which is charming in its own lumpy way, but some of it had to go. In certain areas it was literally falling from the wall in massive chunks, namely behind the old washer/dryer. So down it went.

The house lacks insulation on all exterior walls. When we repaired the fireplace wall in the living room, we added insulation. Not only does it warm up the place but it also helps cut noise from the street. Value! Anyway, I figured since this kitchen is a gut, might as well take the exterior wall down to studs too. You learn so much about your house doing this. We found both windows were wider and taller. The door to the back studio (which used to lead outside before the addition) was also wider, or maybe it had a window panel down its side.


 {exterior wall, to the right of the fridge is our pantry}

The kitchen had a double-bowl stainless sink that worked fine. We thought we'd be able to demo around it and prop it up with a couple 2x4s. Ha! The ignorance... of course it came crashing to the ground. So we took this opportunity to buy our first cabinet and dream sink. I've been pricing about town and like so many of us, landed on Ikea. We're going with Lidingo for the most part (intend to customize somehow, mix it up a bit) and the Domsjo sink can't be beat. To help support the sink and give us more liveable space (I expect we're going to be in this state quite a while) I built a couple makeshift countertops. It's simple 2x4s, MDF and particle board. Both counters cost about $50 with paint. Mike wasn't a believer and I'm still trying to prove this was worth it. I figure when it's all said and done, my fake counters will make the perfect worktable in the garage.

{DIY build on the fly. Its function: support the sink and provide valuable workspace}

 {view up the steps from the "back studio", that's fancy talk for addition, and "addition" is fancy talk for porch with walls.}

There are two vents for a stove. The one hanging out of the ceiling is current, but the behemoth behind is from the olden days. Still not sure if we plan to remove it, it really isn't in the way. Right next to it is a little built-in cabinet we plan to keep, either as a broom closet or giant spice rack. The drywall on the right is the back of a closet in the dining room. The left wall is repairable, just uneven from poorly done patches. Can you picture the entire span of that wall as a chalkboard? I can...

{opposite view walking in from the dining room}

Ugh, those floors and that ceiling! The ceiling is a nightmare. I need to call in reinforcements. There is drywall on top of plaster in SOME spots, plus that header from the wall we took out, plus that entrance to the attic is getting moved to the hallway. It's going to take a lot of work to level it out, a project for the pros. I want to swap out that door for a sliding barn door, in a vibrant color maybe? Still no verdict on that window. I need the light big time so I don't want to wall it in necessarily.

I wanted to leave you with something pretty. The window above the sink gets crazy light, so it's lined up with plants that currently have no where else to go. Adorable, yes?

So there you have it. Our little kitchen, skinny legs and all. We still don't have a stove, we still use the old basement refrigerator. But we're actually enjoying the log cabin feel of our exposed skeleton. Don't worry kitchen, we have big plans for you...

2.20.2010

What I mean when I say "demo" {PART 2}

The kitchen is the heart of the home, or something like that. Ours is the bane of my existence. It was the very first room we started ripping into and it may well be the last thing we finish. A kitchen is a BIG DEAL and I was unaware of its complexity, its many layers (of linoleum. of which there were 4). There is much to consider: walls, floors, electrical, water, gas, counters, cabinets, upper, lower, how tall? how many? is Ikea tragic or perfectly suitable? maybe Home Depot or something custom we likely can't afford? Then of course appliances, fixtures, lighting. Oh, it would be so nice to put wood floors in here. I'd stain them nearly black but that means I would have to refinish ALL the floors to match and that would be lovely, but oh... maybe tile is fine?

This is my brain. at night. when I can't sleep.

All of that insanity, that's the fun part, and yet again, we aren't there yet. Where we are is a state of progress. We can see what we have and we've eliminated all the waste. The kitchen will have its day once we repair all the rot and leaks everywhere else. So it lies in waiting. Here's where we've been:


The kitchen before, well, it was old. Normally I love old and go out of my way to cherish it. But this kitchen was old, haggard, dirty, dingy and expired. The cabinets were solid wood, I'm guessing from the 50s and they'd been painted many times over. Did I mention dirty? This applies here. They weren't functional, the corners impossible to reach. I think our seller would agree because she left food in the way back. Other surprises were spiders and ants. Yum! Note the lowered sink. This coordinates with our wheelchair lift and tall toilet in the bathroom. That tube hanging off it is from the old refrigerator. We bought this house with no appliances which honestly, was a blessing.


See that wall there. I hated it from day one. It sections off what was a laundry room and office. That space was dark and begging to be part of the kitchen. And since the laundry was going downstairs I set my sights on tearing it down.


Here's the original laundry area. At first glance it isn't so bad. Those cabinets are kind of cute, physically slimy but charming in a way. Sadly, they were built in so tightly to the wall, they became casualties of demo. And the floor, well, its rotten. The washing machine must have been quietly leaking for years.


It all started with the floor and a curious little jab in the lino. We just wanted to see if it was going to be hard or easy to remove. One thing led to another and the next thing we knew, demo was underway.


Destroy!!! We got down to the soft wood in some spots but that last layer of lino was proving tough. One contractor said it probably contains asbestos so our best bet is to stop chipping at it. We will lay our new floor, whatever that may be, right on top.

Next Mike surprised me by removing the vent hood. This was the greasiest thing I had ever seen and I couldn't walk by it without gagging. I'd much rather look at this messed up wall. We uncovered the original stove pipe peaking out. This thing is intense and all mortor of some kind, super solid. Luckily it's been sealed in the attic so other than being gigantic, it proves no harm. We'll likely leave it there as homage to 1922.


And now for the nitty gritty, cabinets and soffits. See ya!


I want to note, we did get permission from a contractor to tear out that wall. It wasn't supporting a thing. During demo we discovered that part of this wall was actually original. I thought surely the whole thing had been added when they created the laundry. Using my Sherlock skills I determined that only the pocket door was added and at one point this was a simple wide entrance. To where? A mudroom?


And here we sit. This is our mostly-demoed-exposed-asbestos-floor-but-look-at-how-open kitchen!


Right about now, you may wonder how we survive. Well, we did bring up the basement fridge, gave it a makeover. Then of course there's the microwave. But best of all, the trusty George Foreman.