Showing posts with label fireplace. Show all posts

6.04.2013

CORD WRANGLING

I previously revealed the new built-ins in the living room and shown how our TV sits above the fireplace, but I failed to get into detail of how we got it up there and where are all the cords?!

So...

For components, we have a PS3 and a cable box. It was my intention that both of these items would fit inside the bookcase. I figured with custom shelving, it could be built to fit. Totally reasonable, yes? Alas, the depth of the fireplace determined the depth of the bookcases and the PS3 is an unfortunately wide load, or deep one.

On the wall behind the TV is a power outlet which we installed when we replaced this wall. We also added a cable line and ethernet port, inside what is now the left bookcase, when we did new electrical work in the kitchen and basement. Was this the best idea? I don't know, but it made sense at the time. I've since been informed there are these newfangled wireless televisions and in the future we won't need components. Not like I'm in the market for a new TV. Have you seen my bathroom? Yeah, I'll be buying sinks and toilets first. (BTW, you have not seen my bathroom. I've never revealed it here. Horror show.)

So while designing the bookcases, I asked the carpenter to make sure we could reveal the cable/ethernet ports on the top shelf. Once the shelving was installed, we then created a channel from inside the shelf to the top of the mantel to feed all the cords.

That circle is a portal (I love the word portal) to the mantle and the mantle has a similar cutout which feeds wires to the TV and outlet. In between is the guts of the fireplace which serves really well for channeling extra footage of wires. Does that make sense? A few years ago, I won this BlueLounge CableBox by being Third-Runner Up in a contest on Apartment Therapy. I used to use it by my work desk, but decided it would be perfect inside the bookcase to hide the power strip.


And here is where the cords come out on top of the mantel. Just a bit chaotic and not what I had envisioned.

In the meantime, a decorative box completes the disguise.

It's not too bad, definitely better than all the cords trying to find a home on top of the mantel. Soon enough, I will hang the television on the wall. Once I do that, the PS3 can scoot down to the mantel, it's too tall to fit now, and the cable box can take its place inside the bookcase. That will clear both outer shelves of anything tech and maybe, just maybe, I can decorate. Phew!

PS - Do note the plate rail has been installed! All I have to do now is a whole lot of wood filler, caulk, priming and painting to call this wall complete!

5.06.2013

CATCHING UP » THE LIVING ROOM

The living room has come a long way. Not all the way to completion mind you, oh no, not ever. But certainly a far cry from when I first laid eyes on it. We started here:


Looking at this picture is surreal. We were so full of excitement at homeownership, not yet jaded by costs and time and the general stress of it all. We were downright gleeful eating our McDonald's and ripping out that carpet, sitting on those patio chairs. I purchased those two yellow pots for the front porch from Smith & Hawken before we even closed on the house. Silly me thought we'd be working on the yard in no time!

We gave everything a good scrub, took down those dusty curtains and hung temporary paper blinds in their place. (Little did we know those blinds would hang for two years!) Then we moved in.

What happened next was chronicled on this very blog oh so long ago, here, here and here.

After which we were left with this, and it stayed this way for a very long time. Until we found ourselves with a baby en route and simply could put it off no longer. It was straight-up dangerous with that exposed fireplace and no flooring.

Enter a good friend and carpenter who happened to stop by one afternoon to talk shop with Mike. He took a look at our wall and I told him my plans to replace the bookcases and add a mantle and somehow put the TV up there because the room is so small and we need all the floor space we can get, and how should I reframe those windows and blah blah blah. His response? I could do that for you, totally easy, no big deal.

Our jaws dropped. Are you serious? Are you some sort of angel sent from above? YES! YES! YES! Was our resounding reply.

What followed has been a couple years worth of random weekend drop-ins, each one with another step towards progress. I mean, he's a busy man with a full-time job and a family and a serious commute. I get it. And we are very happy with the results. What's left to do is attach plate rail across the windows/wall and trim out the bottom of the cases and we can call this a wrap.

Verdict: LOVE. They are aesthetically simple and very functional. The varied heights are more interesting than what was there. The glass doors are a nice touch and the bottom cupboards are great storage. Our friend built and installed the cabinets and mantle. What did Mike and I do?

• Cut the fireplace tile down by one and a half rows so that the TV wouldn't be too high.
• Added insulation to the flue, sealed off the smoke chamber of the fireplace with a board since there was no damper. Should be added we also put a steel cap on the chimney outside, per our inspector's suggestion.
• Caulked and painted everything—walls, trim, bookcases, mantle, tile and inside of the fireplace.
• Hung some doggone blinds, thank you very much

The built-in on the left houses our photo albums, some books and DVDs in the bottom. Baby-proofed or else I'd be picking up DVDs every. single. day.

The bookcase on the right gets a little more action, being near Thora's play zone.


The top shelves I use to display objects inspiring to me—a collection of mini-zines, my favorite Campus Cuties etc. It's a work-in-progress. These shelves are not nearly full enough!

The bottom is all Thora, all the time. Books, puzzles, crayons. This is her hub. She loves it. She opens those doors with ownership. She knows how not to pinch her fingers and sometimes, if I'm lucky, she'll even put some stuff away.

The rest of the living room follows suit. Half for Thora, half for Mommy and Daddy. I hope to one day remodel the addition on the back of our house into a playroom/guest room/home office and all of this will move back there. Until then, this works out dandy.

Here is her little Kritter table and chairs set from Ikea. That doll was a birthday gift, handmade in my hometown and others are available here. Apparently her name is Meep.

On the opposite wall is an Expedit bookshelf full of toys. Expedit is a requirement for all 21st Century parents, don't you think? This is one of two that we own. The other is in her room and doubles as a bench. That glider has got to go. It served its purpose for nursing and things, but today it is a hazard. I'd like to replace it with a pair of chairs and have been on the prowl for ages.

I love this lamp. What should I fill it with?

What's next? After finishing the bookcase wall of course...

A new couch. I hate that couch. I am so over that couch. It's a pullout that we bought when we first moved to Northern California. It was from the clearance section of a now-defunct Levitz. And I hate it. We used to have this amazing sofa from Williams Sonoma that I got off of craigslist when we lived in San Diego, but it didn't fit in the moving truck! Tragedy.

Obviously, the floors need to be refinished. I'm actually glad we didn't do this right away. If we had I would've stained them very dark. Today, I would do a lighter, slightly grey, walnut look. Cha-ching.

New windows of course. I'd like to do real wood windows here and in the dining room, since they are part of our curb appeal. Then vinyl throughout the rest of the house.

Decorate! We need art in this room. Bad. Some personalization would be ever clever.

Gone is the shag, the popcorn, and of course, the rotten wall. In its place is an in-between room, a make-do. Livable, but not designed. I think it's a far cry from where we started!


3.27.2010

We have a wall, people

It's been a long journey between myself and the fireplace, but man, we've come a long way. Of course you know about the leak, and the damage, and the ripping out of everything decorative exposing the naked chimney, so frail. This was traumatic.

After revealing all the issues and fixing the leak, but before Bob got started on the repairs, we had a fireplace guy give it the once-over. Verdict: sadly, but not unexpectedly, she's beyond repair. Due to cracking (via settling or a million tiny earthquakes) the fireplace box and face, including everything below, would need to be rebuilt in order to ever burn wood here. We would also need to line the flue with stainless and other what-not. He mentioned gas insert options, but these don't interest me. I consider gas fireplaces glorified space heaters and void of character. I'd actually prefer decorative. In reality, a complete rebuild is not that expensive, but we have other fish to fry (really BIG fish) and it's simply not in the cards.

As such we asked the guy, before closing up this wall what can we do to maintain the possibility of a rebuild in the future? I'd hate to make a beautiful wall only to win the lottery and tear it all down again. I mean, this could happen.

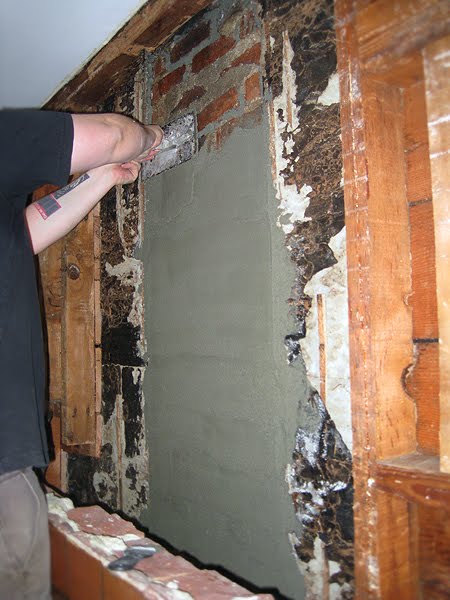
Since the chimney itself is in good shape (not pulling away from the house, flue tiles in tact), he suggested we mortor over the chimney inside, protecting the flue tile, preventing further crumbling of the brick and basically sealing up passageways for smoke. Uh, what? He assured us this could be done by us and for less than $20. He gave us the recipe and I ran off to Orchard Supply.

Ingredients
concrete bonding adhesive
one bag mason mix
one bag mortar mix
water
grout bag
big plastic tub (thanks Bob!)
trowel


After scraping all the loose bits off with a wire brush, we painted over the whole thing with a bonding adhesive, being sure to get in all the nooks and crannies. We picked up a cheap wide brush for this so we wouldn't feel bad going to town on it. It's all water-soluble for an easy cleanup.

While that dried a bit (you want it almost dry but don't wait too long!) we went outside to mix up the mortar.


We did half of each bag, eyeballing it. Concrete is not rocket science, perfect for me! Added water and mixed until we had something a little thicker than pancake batter. You should be able to hold your trowel at a 90 degree angle and it sticks.


Mike did all the application, it takes some real arm muscle and I lack that. But I got gusto! Anyway, first thing is to fill in all the cracks using the grout bag. This is instantly gratifying.


Next is applying the parge coat. This was ideal practice for the basement work we have coming up since we didn't need to worry about it being perfectly smooth. We did have to concern ourselves with making it too thick since Bob was going to drywall over this.


Mike rocked it out, Bob was impressed.


Once it was dry, Bob got started on finishing off the wall. We headed down to Long Beach for some family r&r and when we got home, we saw this. So clean! So WHITE! Look at that little outlet, total asset. Now all we have to do is rebuild the bookcases, the mantel and trim out the windows. Bonus, Bob is getting us custom plate rail to match the rest of the house, as a gift. We are some lucky ducks.

3.01.2010

Progress! ...and a fireplace update

It's all happening, the buzz of saws and the slams of a hammer, music to my ears. This is a big week. We finally settled on a contractor for the dry rot. At this very moment, my new best friend Bob is down in the basement toiling away. Some things you just can't do yourself and anything structural qualifies. Bob's list of to dos:

1. replace dry rot in new laundry room, under old laundry room, above the fireplace and under the porch
2. repair main beam under old laundry room and replace single support post and wall with two new supports so room can remain open
3. repair subfloor in kitchen (he actually has a stockpile of the same wood planks so we don't have to use plywood)
4. remove all unused water and gas lines in old laundry room and cap off
5. remove old furnace under entry/dining room

All of this will take two weeks and immediately following, the plumber will install our tankless water heater, my refurbished vintage sink and, drumroll please, the washer and dryer.

What's this? Is the sun shining? Are birds singing?

Not only that but last week we met some great roofers who fixed our leaking chimney. Can you believe the flashing was NEVER done properly, not ever? It was a slow trickle over many, many years that caused that damage. If you can stomach the horror and are in need of a recap, go here.

Speaking of, I did a little more demo on the wall because I was noticing as contractors came through for bids, they were assuming the worst. As such, they're bids were high and the proposed work seriously invasive. I figured it best to remove all the wall and the bookcases down to the studs so we can really see what's going on. It was messy but totally worth it.


It was exciting to remove that 70s paneling and unearth the original beadboard. At first glance, I thought it was intact. Alas, that wasn't so. It was pretty crumbly and even cut up on the right side. I still plan to salvage these boards and try to make something small, a curio maybe, but their life surrounding a mantel is over.


Never in my life have I seen the guts of a fireplace and I had no idea how they are put together. Tomorrow a chimney expert is coming over to give it a once-over and educate us on the possibilities, if there are any. Right now we are thinking this burned coal, that it is heavily damaged and unless we spend thousands, it will never be more than decorative. But we'll see what the experts say.


Voila! See that angled 2x4 and how it's completely missing at the chimney? It directed water to flow to the left, leaving the entire right side intact. Really, not so bad!


Once we got this far, the windows literally begged to be stripped. I still can't fathom the intention here. Anyway, it was Valentine's Day and the sun was out so we went for it.


Two coats of Citristrip and some good scraping and it's a whole new world. Isn't that right, Orange?

12.13.2009

I made a mess

It was the weekend after Thanksgiving. My husband was in the back working and I was sitting on the couch watching tv. In the corner of my eye was the wood paneling. That wood paneling, behind the bookcases, surrounding the fireplace and most certainly covering two windows. And it was eating me alive. I could think of nothing else. What do the windows look like? Are they broken? Is there glass there? From outside you can see them, painted over. These windows are a classic feature, traditional and must be restored.


So I started picking at it. Innocently I grabbed a blade and thought, I'll just cut out a peep hole, look inside with a flashlight, just to see. It was a small peep hole, about 4x6 and when I looked inside, motherload! Glass! unbroken! I figured, this isn't so bad. Surely, they must have put the paneling up because they were insane and didn't like natural light. I will remove this and surprise my husband with my do-it-yourself enthusiasm.


 So I took my blade and made a neat incision along the length of the bookcases and across the mantel. Hmm, what's this? The wood on the mantel is soft and kind of popping up. Scrape. Scrape. Oh god, termite tunnels.

Need I say more?


I popped off all the upper paneling and discovered the windows were the least of my problems. Yes all molding had been removed to accommodate the paneling, but our molding isn't fancy and can be replicated easily (I'm pretty sure). And I can get paint off of glass, once it warms up outside. But above the mantel, sigh, it all came crumbling down. Dry rot. A lot of it. And some ants. And a breeze. And evidence that termites have come and gone. (And I mean gone because we have termite blasted this house).


This is about when my husband walks in and says, oh jeez, what have you done?


In the end, all dry rot seems to be located above the fireplace. One of our guys (he's actually my dad's guy and childhood friend who promises never to steer us wrong) says it's not so bad. We should remove all dry rot and probably the plaster all along that wall and then reframe, drywall etc. I'll take this opportunity to add some sconces and maybe redesign the mantel and bookshelves. The damage was probably caused by a leak in the roof some time ago that has since been repaired.


In the meantime, I thought it best to winterize the area, then walk away, slowly.