
After revealing all the issues and fixing the leak, but before Bob got started on the repairs, we had a fireplace guy give it the once-over. Verdict: sadly, but not unexpectedly, she's beyond repair. Due to cracking (via settling or a million tiny earthquakes) the fireplace box and face, including everything below, would need to be rebuilt in order to ever burn wood here. We would also need to line the flue with stainless and other what-not. He mentioned gas insert options, but these don't interest me. I consider gas fireplaces glorified space heaters and void of character. I'd actually prefer decorative. In reality, a complete rebuild is not that expensive, but we have other fish to fry (really BIG fish) and it's simply not in the cards.
As such we asked the guy, before closing up this wall what can we do to maintain the possibility of a rebuild in the future? I'd hate to make a beautiful wall only to win the lottery and tear it all down again. I mean, this could happen.
Since the chimney itself is in good shape (not pulling away from the house, flue tiles in tact), he suggested we mortor over the chimney inside, protecting the flue tile, preventing further crumbling of the brick and basically sealing up passageways for smoke. Uh, what? He assured us this could be done by us and for less than $20. He gave us the recipe and I ran off to Orchard Supply.
Ingredients
concrete bonding adhesive
one bag mason mix
one bag mortar mix
water
grout bag
big plastic tub (thanks Bob!)
trowel

After scraping all the loose bits off with a wire brush, we painted over the whole thing with a bonding adhesive, being sure to get in all the nooks and crannies. We picked up a cheap wide brush for this so we wouldn't feel bad going to town on it. It's all water-soluble for an easy cleanup.
While that dried a bit (you want it almost dry but don't wait too long!) we went outside to mix up the mortar.


We did half of each bag, eyeballing it. Concrete is not rocket science, perfect for me! Added water and mixed until we had something a little thicker than pancake batter. You should be able to hold your trowel at a 90 degree angle and it sticks.

Mike did all the application, it takes some real arm muscle and I lack that. But I got gusto! Anyway, first thing is to fill in all the cracks using the grout bag. This is instantly gratifying.
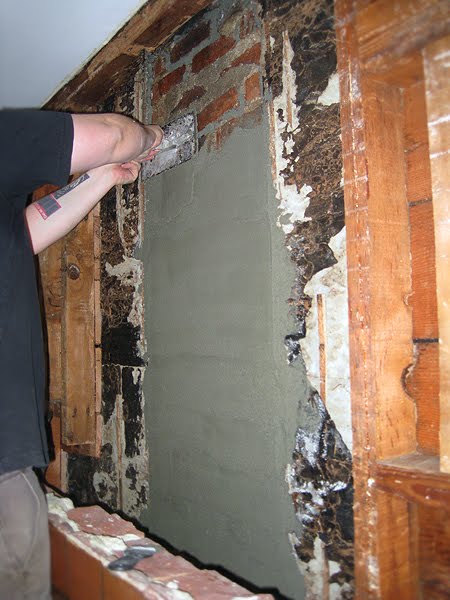
Next is applying the parge coat. This was ideal practice for the basement work we have coming up since we didn't need to worry about it being perfectly smooth. We did have to concern ourselves with making it too thick since Bob was going to drywall over this.

Mike rocked it out, Bob was impressed.

Once it was dry, Bob got started on finishing off the wall. We headed down to Long Beach for some family r&r and when we got home, we saw this. So clean! So WHITE! Look at that little outlet, total asset. Now all we have to do is rebuild the bookcases, the mantel and trim out the windows. Bonus, Bob is getting us custom plate rail to match the rest of the house, as a gift. We are some lucky ducks.

No comments:
Post a Comment