2.25.2011

VCT IN THE KITCHEN? WORKS FOR ME!

After the drama surrounding the drywall, I needed a simple project. Most people would not say installing flooring is simple, but in all honesty, this was! You may remember that I had found a great deal on wood floors for the kitchen. The contractor came highly recommended, his price was right and I really wanted them. But last minute expenses ate into the budget and even though they were a good deal, we could no longer afford them. I came to this realization on a Tuesday. By Wednesday I had designed and purchased alternate flooring, and resolved to do it myself.
The only aspect of this project I wasn't comfortable doing was leveling and putting down a subfloor. The folks at the flooring store gave me good direction, Mike and I went shopping for supplies and we called Steve for the labor. We used 1/4" luan board for the subfloor. Steve installed this using gold screws every four inches at the seams, then every 6 inches across the field. After he was done, Mike spackled all the screws and seams, then gave it a light sanding.

I chose to go with VCT flooring. Is this controversial? Maybe a little too taste-specific, as my realtor might say? Perhaps. It either conjures positive memories of your grade school (as it does for me) or a fear of long hospital corridors. But I think it's all in the application. It seems to be in the middle of a resurgence for residential use, no longer relegated to 70's basements, hand-in-hand with dark wood paneling, it's okay to bring it front and center. And it comes in so many colors!

Side note: I generally hate most tile. It's too typical, especially what we could afford and with our timeframe. I went to the big box stores and tried to get myself to like something, anything in the porcelain or stone variety. It all said "blah" and "eh" to me. As I walked the aisle, I believe I mumbled these phrases out loud.

We went with Mannington Essentials in three colors; Silver White, Pewter and Night Black. I did a little internet research to define my pattern and was inspired by a basketweave I had found. Once I decided on my pattern, I hit up my digital kitchen floorplan that I had created in InDesign and started laying it out. I wanted to make sure I had the least amount of cutting to do–that the perimeter would be nice and visually even. I think this was a key step in making the process simple. That little printout of my design was critical during layout!
First step was to determine my 45 angle. I used a carpenter's square in the corner, then snapped a chalk line the length of the room. I used that line to roughly lay out the tiles to make sure they matched my computer drawing, which mine did, I couldn't believe it! I then chose a single tile as my starter and with a Sharpie I carefully outlined it. You start laying tile in the middle of the room because if you can help it, you don't want to touch the glue! I stepped on it once and lost a sock.
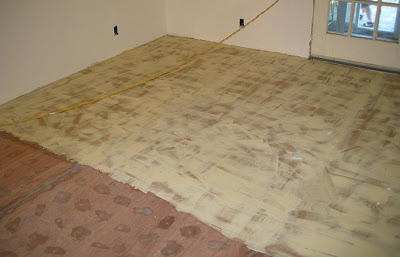
Next is to trowel on the glue, pay attention to manufacturer's specs. You want to do half of the room at a time, starting in the corner and working toward the middle. Oh crap, I let the extension chord sit on the glue! That was fun to remove I tell you.
Believe it or not, this glue is nontoxic with no-vocs. I was told it was safe to use while pregnant, but it is some stinky, not to mention sticky, stuff!
Wait impatiently for glue to dry from yellow to clear, which indicates it's ready for tile.
Starting with the outlined tile, carefully start placing tiles, butting them TIGHT. I referenced my printout often to make sure I didn't screw up the pattern. If you make a mistake and need to take up a tile, it's really difficult and the tile will break. Growl. This part goes fast and once complete, repeat the process on the other half of the room, then retreat to the couch with a piece of cake. I waited to do the perimeter and any cut tiles the next day, the glue gives you 24 hours to set tile.
I forgot to take a picture of my template! It was a cardboard contraption that I used to measure my cuts, and made the process fairly uncomplicated. It's okay if the tiles aren't tight to the wall since this will eventually be covered with baseboard. The tiles cut easily by scoring with a utility blade, then carefully snapping. Not gonna lie, this was simple but tedious. My fingertips were pretty raw by the end.

Once it's done, stand back and stare at it. Leave the room then comeback, just to make sure it's still there. Go ahead, let your cats crawl on it, they will be mesmerized. All that's left is to wait 24 hours for glue to set, give it a good clean using this, then coat it 3 times with this. Let it dry and you are DONE!

2.22.2011

DRYWALL, EASIER SAID THAN DONE

Drywall, sheetrock, tom-A-to, tom-AH-to. I'm from the Midwest so I'm going with drywall, and it was a nightmare. On TV, it always looks so simple, casually mentioned post commercial break. And our drywaller, he promised to do the entire kitchen and basement in 4 days. I gave him a skeptical look but he nodded his head and yes, yes, 4 days. Fast forward three weeks later, and the walls were finally complete.

I'd like to spare you the details but they are truly breathtaking. Let's sum it up like this: show up late, don't show up at all, don't call, sneak out the back door at the end of each day, no progress checks, on days you show up you are greeted by overstressed pregnant lady who walks through all your mistakes, you give her excuses, lots of them, you tell her she's nesting, she hands reigns to husband, your definition of a skim coat equals my version of frosting a cake, there is lots of dust and you are messy, I'm the one who put plastic on my doorways, your truck breaks down, we don't see you, you send a text message with photo of your tire, no note, this is odd yet becomes the norm, and seems to go on forever.

BUT, in the end, those are some nice looking walls and ceiling. We are happy and you apologize. I hand you a check and we call it a day. I don't hate my drywaller. I think he promises more than he can deliver and I imagine most of his projects go this way. I would not want his life.

And now... our kitchen. With walls! And what's that? A ceiling!

 {Future location of stove and microwave, original swinging door to dining room.}
 {Still rocking the awesome security system. Yes, that is a dowel rod. Handmade curtains 
and a beautiful pendant light will soon serve as genius distraction.}
 {Looking towards the addition, knock-off tulip table to go under that window.}
 {Future pantries (two!) surrounding a fridge, with ice and water in the door. The luxury!}

Note the floors by the way. Trusty Steve laid a subfloor for us that I will go into great detail about next. And the basement is it's own entity also to be revealed later. I'd like to point out Mike had to do the final sand in this kitchen. We could not wait for said drywaller, with a deadline for painting and other things. Time to MOVE ON I say.

2.19.2011

It best come down - Part Two

Once we got the ceiling down, it was time to evaluate. If these walls could talk, they would have many tales of hack jobs, making do and downright get 'er done. I felt sad for my rafters and walls. They are old and there was evidence of abuse. They needed therapy.

We call in Steve, good old carpenter Steve, who's bailed us out now, I don't know how many times. He sweeps in with his trusty tools and gruff voice, our personal Mike Holmes. There were rafters cut right down the middle—either pieced back together with masses of nails or left to dangle, fingers crossed by past homeowners that it all stays put. (Oh, THAT's why our ceiling sagged!)

In one day Steve replaced 6 rafters and attached boards from the roofline to the rafters for added support. He agonized to get everything level for the drywall to come. It's a beautiful thing when you see someone carefully work on your home. We were left with a secure ceiling, designed to last another 100 years.
Of course, we were also left with an open ceiling in the dead of December. I think this was Christmas week too. See that vent up there on the left? That goes right outside, a big gaping hole of freezing doom. We also couldn't turn on the heat because the cold air return is in the kitchen and we didn't want to suck too much dust everywhere. I bought some space heaters and we huddled in the living room. Me, dear Mike and both kitties, igloo-style.

But that won't do. Not for long. Right away we ran out for insulation and Mike was the man for the job. We got a lot. It was a Sanford and Son moment driving this entire stock home on the back of the Chevy S10. Hilarity ensued!
Of course, this is also for the basement, but that's a story for another day. A little internet research later and he got started. I sat in the other room with the cats, listening patiently to the sound of the staple gun, blap, blap, blap, for hours. After day one, we ended up with this:
 And day two saw the beginning of a room taking shape:
Nice job! We did a happy dance, ate some takeout and called the drywaller. You're up sucker.

1.18.2011

It best come down - Part One

Oh my word. There was a summit in our kitchen between us, a carpenter and a drywaller. We all stood, arms folded, all eyes fixed on the kitchen ceiling.

Drywaller: Yes, that is drywall on top of plaster and lathe, and hmm, it does seem to be sagging. Perhaps it is too heavy.
Me: Well, we could pop off just the drywall and replace it, back on top of the plaster but screwed in tight.
Drywaller: Well, you could, but that would not make it better, it would make it the same.
Carpenter: I agree. Tear it all down, that is best. Only way to know what's really going on up there.
Me: But the insulation! It's old blow in. I'm scared.
Drywaller: Not to worry. It is not toxic, only very messy. I will do it, no charge.
Me and Mike in unison: For reals?
(In walks Electrician who had been working downstairs.)
Electrician: I love this idea. It will make my work much easier.
Everyone together: agreed!

And so it was. We scheduled the drywaller to come back in two days to demo the kitchen ceiling. He was gonna "bring some guys" as they say. Well, the big day came and perhaps with a fresh perspective, he sort of backed out on the deal. He could not handle the insulation, not for free and not today. His guys were "too big." I kid you not, that's what he said. They would take down just the plaster, leave the lathe and we would be responsible for the rest.

I was taken aback, could not compute this curveball. so. very. confused. But yet, even removing the plaster was hard work, and he was still not charging us for it. And his price for the drywall to come was quite favorable, we did not want to lose him. I looked at Mike, my dear Mike, my champion. And he agreed, he would finish the job.

Sagging drywall, gotta go
All gone!
This is what the guys left for Mike. All that lathe and on top, 
about 8 inches of cellulose insulation, so very old and dusty.
Only one way to start. Crowbar!!
Mike worked well into the night to get this done in a single day. I was regulated 
to the other end of the house, on account of being pregnant and all. I tell you, it was 
hard to sit there and not help. This was a lot of work and the guilt runneth over!
He was left with a ton of insulation to shovel into bags, looks like the Moon...
And a pile of lathe to haul to the dump.

Coming up: How we dealt with an open ceiling during the coldest weeks of the year, repairing rafters, relocating the attic access panel, keeping your inspector happy and adding new insulation...